Spiga

Get ip-address widget for your blogger

IF you are a webmaster.Isnt it looks cool to show an IP address widget on your blog.If your answer is yes then Your Wish Will BE Completed in 6 Easy Steps.


INSTALLATION INSTRUCTION
1. Copy code from below choose any one.
2. Login to your dahboard and make your way through.
3. Layout
4. Gage elements.
5. Choose a new gadget ,select html/javascript paste the code.
6. Lick save.


1.IP
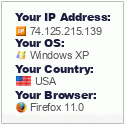


<p><span style="text-align:center; display: block;"><a href="http://win7-vista.blogspot.com/2011/02/get-ip-address-widget-for-your-blogger.html"><img src="http://www.wieistmeineip.de/ip-address/" border="0" width="125" height="125" alt="IP" /></a><br /><small><a href="http://win7-vista.blogspot.com/2011/02/get-ip-address-widget-for-your-blogger.html">Blogger Widgets</a></small></span></p>


2.What's my ip address, create your own visitors IP image


<p><span style="text-align:center; display: block;"><a href="http://win7-vista.blogspot.com/2011/02/get-ip-address-widget-for-your-blogger.html"><img src="http://www.findmyipaddress.info/myipaddressimg.aspx" alt="What's my ip address, create your own visitors IP image" border="0" /></a><br /><small><a href="http://win7-vista.blogspot.com/2011/02/get-ip-address-widget-for-your-blogger.html">Blogger Widgets</a></small></span></p>


3.IP


<p><span style="text-align:center; display: block;"><a href="http://win7-vista.blogspot.com/2011/02/get-ip-address-widget-for-your-blogger.html"><img src="http://www.wieistmeineip.de/ip-address/?size=468x60" border="0" width="468" height="60" alt="IP" /></a><br /><small><a href="http://win7-vista.blogspot.com/2011/02/get-ip-address-widget-for-your-blogger.html">Blogger Widgets</a></small></span></p>
Read more...

How to Save Excel 2010 File as PDF

Transferring documents in PDF file format is very common, Converting Excel document to PDF file and sharing with your customers in protected mode, your customer can’t change it and its is in the same layout that you have created in Excel.
Microsoft Excel also gives an option to save Excel .xslx files as PDF. follow the given steps below to convert Excel file to PDF file.


How to save Excel .xslx file as PDF

Step-1

Click on File tab > Share > Create PDF / XPS Document > Create a PDF / XPS


Step-2

Type a PDF file name, You can optimize PDF file for the Printing or publishing online use Optimize for options.
Tip: you can also save XPS file here by selecting XPS (*.xps) from Save as type dropdown menu.

 for more options click on Options button, you can give Page range to publish, Entire workbook, Active Sheet(s) and more… see below in the screenshot.

 When you finished with options then click on Publish button to create PDF from Excel. Read more...

How to Save PowerPoint 2010 Presentation as PDF File

PDF documents are most commonly used file format and mostly used to easily share documents over internet. PDF files can be protected from changes and avoiding problems for fonts and broken layouts. Using Adobe Acrobat Reader, PDF file can be viewed easily.
What if you want to save your PowePoint presentation in PDF format and share over the internet? Now the question is how to convert PowerPoint .pptx file in to PDF file?
Microsoft Powerpoint also gives an option to save PPTx files as PDF. follow the given steps below to convert Powerpoint PPTx file to PDF file.


How to save PowerPoint PPTx as PDF

Step-1

Click on File tab > Share > Create PDF / XPS Document > Create a PDF / XPS

Step-2

Give proper name to presentation PDF file, to optimize PDF file use Optimize for options, either for Online use or Printing purpose.
Tip: you can also save XPS file here by selecting XPS (*.xps) from Save as type dropdown menu.

 Click on Options button to see more publish options like Range of slides, type of slides to export, and more… see below in the screenshot.

 When you are done with options click the Publish button to convert PowerPoint file into PDF file.
Read more...

How to Save Publisher 2010 File as PDF

Publisher is Desktop publishing application by Microsoft. Microsoft Publisher is use to create publications for Web and Print. Most of the time when you design the publication you need to send it to different persons for review, most of the time to your customer. It is recommended that first convert your publication into a PDF file and then share with anyone. There are lot of benefit to convert it to PDF your coustomer don’t need to install publisher, Your publication layout will be same as you have created in Publisher, no fonts will be changed, customer can open it in Windows or Mac and you can restrict customer from printing or alterations.
Microsoft Publisher also gives an option to save Publisher file to PDF. follow the given steps below to convert Publisher file to PDF.

How to save Publisher file as PDF

Step-1

Click on File tab > Share > Create PDF / XPS Document > Create a PDF / XPS


Step-2

Enter name for your publication PDF file, by default Optimize for option is set to high quality printing, click on Change button to change some PDF publish options.
 You can change how this publication will be printed or distributed, you can change picture resolution (dpi) settings and some other options… see below in the screenshot

When you are done with options click the Publish button to convert publication into PDF file.
Read more...

How to Save InfoPath 2010 Form as PDF File

Microsoft InfoPath is use to design forms and you can covert these forms into PDF file. You don’t need to install any third party utility to convert InfoPath file into PDF. Microsoft InfoPtha 2010 also gives an option to save InfoPath form to PDF. follow the given steps below to convert InfoPath file to PDF.

How to save InfoPath form as PDF file

Step-1

Click on File tab > Share > Create PDF / XPS Document > Create a PDF / XPS


Step-2

Type name for your InfoPath form PDF file in the File name Field, You change the optimization option from Minimum size to Standard for printing purposes.
 When you are done with options click the Publish button to Save InfoPath form as PDF file.
Read more...

How to Apply Watermark in Microsoft Word 2010

If you want to apply a watermark on your Word file lets see how to this easily in Microsoft Word 2007 / 2010. The MS Word 2007 / 2010 allows Watermarking documents either by applying a background image or text. You can apply different Watermarks on Word documents for their individual identification and to secure your personal documents. So, here we see how we can place watermarks on our Word documents in MS Word 2007 / 2010?


Open your Word document in MS Word 2007 / 2010 > Page Layout menu > Watermark


Click on Watermark, it shows a window with different watermark templates as: Confidential, Do Not Copy, Draft, Sample, Urgent etc…..Just click watermark of your choice, it quickly embeds on your document & that’s all. To use any logo, picture or custom text read next step.


You can also create your personal watermark here. Click on Custom Watermark button
 It opens following window where you can select Picture Watermark, browse any image from your desktop to use as a watermark or select the option Text Watermark. So, input text of your choice and set font, language, size color etc & click Apply button
 It quickly embed your customize watermark on your document
 You can also remove your applied Watermark just by clicking on Page Layout > Watermark > Remove Watermark button
 So, it’s very easy to apply, create and remove a Watermark on Word document in MS Word 2007 / 2010.
Read more...

Remove all Hyperlinks from Word File at Once

To remove all hyperlinks from Word document that comes with copied text from website. There is a simple way to remove all hyperlinks from word file.

Remove all hyperlinks form word file at once:
Select all text by pressing Ctrl+A and then press Ctrl+Shift+F9 all hyperlinks will be removed at once.
The links color and formating will not change you need to do it using Clear Formating command.
Another simple way to remove hyperlinks, paste the copied text into Notepad first, recopy and then paste into word file. Read more...

How to Use Presenter View in PowerPoint 2010 (View Notes Privately)

PowerPoint “Presenter View” is a great option to view your presentation with Notes on presenter computer (your laptop), and while the audience will view notes-free presentation on the other display/monitor (like Projected screen). Lets see how to use Presenter View option on PowerPoint 2010 and connect second monitor/display.
Presenter view PowerPoint 2010
Prerequisites: Make sure your computer supports the use of multiple monitors, most computers these days support to use multiple monitors, check your computer manufacturer’s website.

Step-1

Open your presentation file in PowerPoint 2010

Step-2

Click on “Slide Show” tab and Check the “Use Presenter View” option

If you see this message then hit Check button to detect another display

Step-3

Display settings window will open. You will see display 1 and 2 as when you have connected second display, other wise connect the second display and hit the “Detect” button

Now you need to Extend displays, so choose “Extend these displays” option from “Multiple displays” Drop-Down and hit the Apply button

Hit the Keep change button if you see this message and close the window

Step-4

Now go back to PowerPoint and make sure “Use Presenter View” is checked

To run the presentation hit the F5 key from keyboard, you will see presentation view is different on both displays
Presentation view on presenter computer monitor will look like this:
  • Notes area
  • Slide view
  • Slides thumbnails
  • Elapsed time and more

Presentation view for Audience on 2nd display will look like this:
Read more...

Your IP

IP
Blogger Widgets

Copy code, paste your site:

<p><span style="text-align:center; display: block;"><a href="http://win7-vista.blogspot.com/2011/02/get-ip-address-widget-for-your-blogger.html"><img src="http://www.wieistmeineip.de/ip-address/?size=468x60" border="0" width="468" height="60" alt="IP" /></a><br /><small><a href="http://win7-vista.blogspot.com/2011/02/get-ip-address-widget-for-your-blogger.html">Blogger Widgets</a></small></span></p>