Spiga

Windows Vista Media Player 11 Review

Windows Vista Media Player 11 Review

It has been more than a month now that I have been using windows vista as my main operating system at work and home, and one of the things that have caught my attention in windows vista is the new media player 11. I must confess that I have never used windows media player as my media management before, except for a few internet streams and video clips that open windows media by default. I always found Windows Media Player to be clumsy and lacking many features essential in a good media player. But being using windows media player 11 for over a month now, I can say that windows media player is a true media management worthy of adopting it as my everyday media player. In this post and the more that will follow I want to review the things I find interesting on windows media player 11, and how to make use of many hidden features not very well known or used by everyone. Read on.
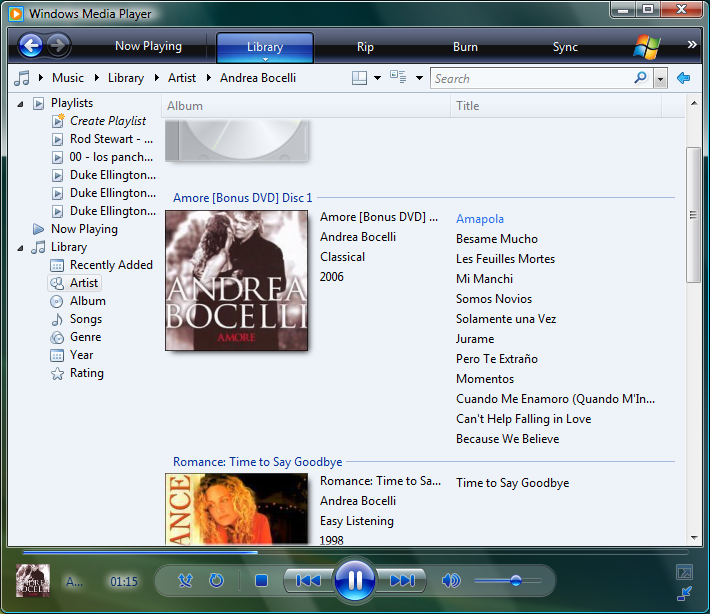
Windows Media Player has gone through many changes since it was released to the public in November of 1999. Until this time windows media player was simply known by the name of media player but after the release of version 6.4 was rename to Windows Media Player. The biggest revamps occurred on versions 9 and 10 and now 11. Windows XP comes with windows media player 9 by default and is upgradable to windows media player 10 or 11. But hence that many features on windows media player 11 are exclusively for windows vista.
When you first launch windows media player on windows vista you will need to go through a quick setup, but don’t rush hitting the next button frank, remember you want to customize windows media player as your liking, not Microsoft, so you need to be careful. The setup gives you two options on how you want to run the windows media player; Express and Custom.
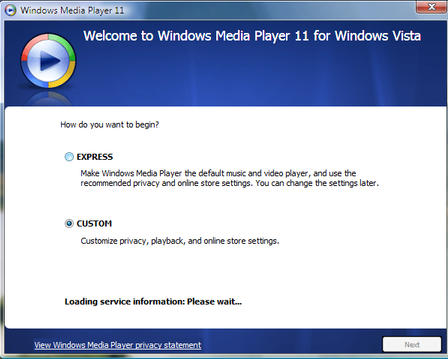
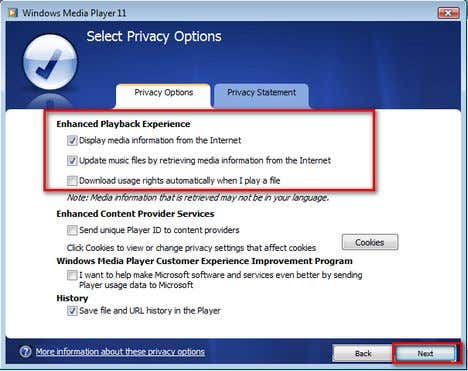
Selecting the express option makes windows media player the default player for audio and video on your computer , it also allow media player to download information for CD/DVD automatically from the Internet as well as media rights information. It subscribes you automatically to Customer Experience Improvement Program and sets Media Guide as the active online store. In other word, the express option does whatever is convenience for Microsoft rather doing what’s convenience for you. Selecting the custom option you can disable any of these things. So, I guess you want to click on the Custom button. When clicking next on the custom button you will get to the privacy option:
You might only what to check the things that are checked within the red square. Think about if you want windows media player to retrieve media information from the Internet whenever you play a file, this is a nifty feature but it could be a pain if you are using a not so fast Internet connection. After you make up your mind, click on the next button. The next option will ask you if you want to have a short-cut on your desktop or quick launch, this should be pretty easy to decide, click next. In the next option you have the option to make windows media player you default audio and video player or choose. You should click on “Choose the file types that Windows media player 11 will play. After that you will get a long list of the file format you want windows media player to play. Remember that windows media player does not support all the well known audio formats. But this is something I will leave for another post. After you choose the file formats that you want media player to play click on save. Now windows media player 11 setup should be complete.
On the next post I will take on the features and cool stuff windows media player offers and much more. Stay tune; better instead, subscribe in a RSS reader to receive the updates in real time.
 
Read more...

How to Reset Password on Windows Vista - Lost Windows Vista Password

 How to Reset Password on Windows Vista - Lost Windows Vista Password
How to reset Windows Vista password if lost windows vista password? When friends and other people who use Vista met with such problem, I am always pleased to help them with useful solutions for Vista password reset. Today, let’s conclude some methods to recover Windows Vista password.

1. Did you create a Vista password reset disk?
If yes, you have created the disk before forgot password, the method will be helpful. While, there are exactly little PC users who remember to prepare such a useful disk. You could easily create a Windows Vista password reset disk through Vista's control panel with a USB flash drive.
a. Start -> Control Panel -> User Accounts and Family Safely -> User Accounts.
b. Create a password reset disk on the left pane.
c. Click “Next”, follow the forgotten password Wizard to create a Vista password reset disk.
On the logon interface with incorrect password, click the reset password link and there will be wizard. Now you can recover Windows Vista password with the created password reset disk on your PC within seconds.
2. Free Vista password recovery tool
There are two popular tools: Ophcrack and Offline NT Password & Registry Editor. The former which is based on rainbow tables will spend you much precious time to download but just can reset passwords less than 14 characters. The latter supports Windows NT/2000/XP, but not AD password recovery.
3. Professional Vista Password Recovery Software
There are many commercial Vista password reset tool, such as Windows Password Recovery Corporation, Windows Password Recovery Tool 3.0, Windows Password Key, etc. With one of this software, you can easily login your PC by burning a bootable CD/DVD or USB flash drive.
Why would the tools be so popular for PC users? That’s because the tools do not require special PC technique or skills. Users can quickly get out problem within minutes!
Let’s take Windows Password Recovery Corporation for example. As one of the best and popular Windows password recovery tool, we just need 3 steps to reset Windows Vista password.
Step1. Burn a CD/DVD/USB Flash Drive to reset lost Windows password.
Step2. Set your target computer to boot from CD/DVD/USB Flash Drive.
Step3. Reset lost Windows Vista password to Re123456 with the burned CD/DVD/USB Flash Drive.
Not only Windows Vista, the Windows Password Recovery Corporation can also be used to recover domain password on Windows server 2008/2003/2000 and local password for other OS, such as Windows 7, Windows XP, etc.
Read more...

Send HTML Emails with Gmail and Google Docs

China leading supplier for quality Silica Fume SiO2 85%-97.5%
All popular email programs – from web-based Gmail and Yahoo! Mail to desktop-based Microsoft Outlook to the mail app on your mobile phone – are now HTML (or rich-text) capable. Thus, your email messages can have custom fonts, inline images, lists, tables and other formatting similar to a web page.

But there’s one little problem - how do you write an HTML email?

The built-in WYSIWYG editors, like the one shown above, offer basic functions for formatting text but there are things you cannot do. For instance, how do you insert a 3x5 table inside a Gmail message? Can you right-align an image and wrap text around it similar to Word?

All this is easily possible in HTML but since your email program won’t let your compose a message directly in HTML, you’re stuck.

I have two easy solutions for this problem. The first is HTML Mail – here you can write an HTML message and send it yourself or anyone else with a click. The tool has a simple WYSIWYG editor but you can also switch to the code view and compose messages directly with HTML markup.

There’s another alternative that uses Google Docs to send HTML mails from your Gmail account itself. It works for both Google Apps and regular Google Accounts.


First make a copy of this Google Docs sheet and then choose Gmail –> HTML Mail to authorize the sheet to send mails from your email account. Once authorized, choose GMail –> HTML Mail again and now you should see a form for sending mails. Fill in the various fields, write any HTML code in the Message field and hit send.

You can use the previously mentioned WYSIWYG editor to generate the HTML markup and copy-paste that code into the Google Docs form. Also, if you wish to send the same message to multiple recipients at once, just separate their email addresses with commas.

The Google Docs option internally uses Google App scripts (class GmailApp) and you can find the full source code under Tools –> Script Editor. So the next time you want to create a more professional-looking email newsletter that has tables and other complex formatting, you know where to go.
Read more...

How to edit PDF files

 How to edit PDF files
There are many ways in which a PDF file can be edited, using a wide range of editor tools that are on the market. This page focuses on the typical editing needs in a prepress environment. The following types of changes are discussed:

  • Text manipulations: how to edit text in a PDF.
  • Image editing: how to edit an image in a PDF file or replace it.
  • Page related changes: how to delete pages, change their order or rotate them.
  • Altering a PDF file: how to merge pages from separate PDF files, edit password protected files or add bleed.
  • Color editing: how to convert a PDF from color to black&white.


At the bottom is also a small overview of PDF editing applications.
Always keep in mind that PDF files are an accurate representation of a document. They are meant for output or on-screen viewing. They are not intended to be intermediate files that can still be edited. There are programs on the market that allow you to change the content of a PDF file and there are applications or plug-ins that can extract the content of a PDF so that you can insert this data into a new document. Altering PDF files is a last resort – whenever possible the original source file should be corrected and a new PDF generated. This is especially true for documents that will be reused at a later date!

Changing text

How to edit text in a PDF

Within a PDF file text is essentially stored as single lines. The concept of text flowing from one line to another within a column does not exist. This makes it fairly difficult to edit text unless you rely on special tools that somehow manage to intelligently predict how text flows within a document
  • Adobe Acrobat & Acrobat Professional have a TouchUp Text tool for small text modifications. When you add or delete text, it will not reflow the text in the entire column. Some releases of Acrobat have a pretty bad reputation when it comes to the TouchUp Text tool, with users reporting weird behavior of the edited or remaining text once the tool is used. Use this tool only if there is no way to edit the original source file and  recreate a PDF.
  • Even though Adobe Illustrator can open a surprisingly large range of PDF files, it is a bad choice if you want to edit text. Illustrator automatically uses its own fonts instead of fonts embedded in a PDF. This can lead to text reflows even if you leave text untouched.
  • For extensive text editing Infix PDF Editor is an interesting product. I used it to add text to a book and found the reflow capabilities of the application quite impressive.
One thing to keep in mind is that there is a mechanism in PDF to store a copy of the text in its logical reading order. If you edit the text in such a so-called ‘tagged PDF’ you are only modifying the visible copy, not the hidden duplicate. That means that even after removing part of the text, it still may show up in search results!

Changing images

How to edit an image in a PDF file

There are several high-end tools on the market that are optimized for this type of task. It is however surprising how much you can already achieve with Adobe Acrobat, provided you also have applications like Photoshop and Illustrator. In the ‘Touchup’ Preferences of Acrobat you can define which image and object editor you want to use from within Acrobat. Once this has been defined, you can use the Touchup Object Tool to select an object, context-click it and select the Edit option. In the case of an image, the default application (Photoshop on my set-up) opens the image. After changing the image, it is re-embedded in the PDF file.
Acrobat touchup object tool (far right)
Acrobat 8 Touchup Object Tool (far right)

How to replace an image in a PDF file

The above procedure for editing images can also be used to replace graphics. Use the Touchup Object Tool to open an image or artwork in Photoshop or Illustrator. Replace the content with the new image or artwork that you want to insert. In the case of images it is best to maintain the resolution of the image you originally opened. Once the content is swapped use Save to reinsert it back into the PDF. There are other ways of swapping images which get discussed in this b4print thread.

Changing pages

How to delete pages, swap or rotate them

Adobe Acrobat can do all of this but there are most likely cheaper solutions around. I never bothered to check.

How to reverse the page order

If you need to swap the order of all the pages in a PDF so that the last page becomes the first one,…. check out this thread in the Adobe forums. It discusses a script for Acrobat 9 and Acrobat X. I tried the latter version on both Mac & PC and it worked fine.

Changing color

How to convert a PDF from color to black&white

Most recent versions of Acrobat Professional can be used to convert a PDF to B&W. In Acrobat 9 Pro select Advanced > Print production > Convert Colors. Activate the option ‘Convert Colors To Output Intent’ and scroll all the way down in the list of profiles until you find the grayscale ones. Select an appropriate one and click OK to start the conversion.
There are also some Acrobat plug-ins that can do this. I have used PitStop but prefer Quite-a-box-of-tricks which seems to be both faster and more reliable (in the past PitStop sometimes left some objects untouched).

Changing the entire PDF file

How to merge pages from separate PDF files

There is a separate page on this site dedicated to this topic.

How to edit a password protected PDF file

The PDF standard supports an extensive set of security features to prevent users from accessing certain features of a PDF file. One of these is the ability to edit PDF files. When you get such a protected file, the correct procedure is obviously to contact its creator and ask for the password to unlock the file. Unfortunately it is sometimes difficult to contact that person or agency or even impossible to find out who locked the file. There are a couple of alternative solutions:
  • The ColorSync utility that was included in OS X releases before version 10.5 overwrites PDF password protection. Simply open the PDF using it and do a ‘Save As’.
  • PDFkey Pro is a commercial multi-platform tool that can remove the password protection from a PDF file. Another option for Windows users is Jkwebtalks’ Free PDF Unlocker.

How to add bleed to a PDF

Information on what bleed is, why it is needed and how it can be added to a PDF file is available on my page about bleed.

How to add, edit or remove metadata in a PDF

There is a separate page about working with metadata on this site.

PDF editing tools

Below is a short summary of the various types of software that are available on the market to edit PDF files.
  • Adobe Acrobat (Professional) can be used to both view and manipulate PDF files. Next to the basic function discussed above, it can be used to completely repurpose PDF files (add multimedia elements like sound and video, add clickable buttons,…).
  • Plug-ins can be installed in Acrobat Professional to enhance its ability to edit objects within PDF document. The most well-known one is probably PitStop Professional from Enfocus. Another popular choice is pdfToolbox from callas software.
  • Even though Adobe carefully avoid positioning Adobe Illustrator as a PDF editor, a remarkable number of PDF files can be opened and modified in Illustrator. Its major weakness spot is text handling.
  • There are a number of stand-alone PDF editor applications on the market. Google is your friend :-)   Applications that I have gotten positive feedback about are:
    • Enfocus offer Neo, a stand-alone PDF editor that is a lot faster than working in Acrobat. This b4print discussion is about this product.
      Oris PDF Tuner is another alternative solution that seems to have a good reputation.
    • Companies who make their money processing PDF files, such as newspapers who need to be able to make small modifications to advertisements, often use the products of OneVision to edit PDF files. These are probably the most powerful editors on the market, with a matching price tag.
    • Recosoft created an interesting plug-in, named PDF2ID, which can convert a PDF file into an InDesign publication. This tool is discussed in this thread on the b4print forums.

Read more...

Scriptalicious SEO Scripts Pro 2.0.2

Scriptalicious SEO Scripts Pro 2.0.2


Demo here
Admin account: admin / admin
77 powerful SEO scripts. Adds 40 brand new tools to your SEO arsenal:
  • Keyword Rich Domain Finder
  • Link Extractor
  • Keyword Extractor
  • Twitter Links Finder
  • Digg Links Checker
  • Delicious Link Checker
  • Bing Indexed Pages Checker
  • Site Rank Checker
  • Authority Link Checker
  • .edu Backlink Checker
  • .gov Backlink Checker
  • DMOZ Backlink Checker
  • Compete Ranking Checker
  • Convert UNIX Timestamp
  • Convert Date to Timestamp
  • Email to Image Converter
  • Alexa Multiple Rank Checker
  • Multiple PageRank Checker
  • Multiple Backlink Checker
  • Robots.txt Checker
  • Multiple PageHeat Checker
  • Multiple Fake PageRank Checker
  • Multiple .edu Backlink Checker
  • Multiple .gov Backlink Checker
  • Multiple DMOZ Backlink Checker
  • Multiple IP Address Checker
  • Multiple Reverse IP Lookup
  • HTML Markup Validator
  • CSS Validator
  • Google Indexed Pages Checker
  • Yahoo Indexed Pages Checker
  • Multiple Compete Rank Checker
  • Compete Statistics Checker
  • MSN Live Indexed Pages Checker
  • Multiple Compete Statistics Checker
  • Multiple Digg Links Checker
  • Multiple Delicious Link Checker
  • Yahoo Directory Backlink Checker
  • Webpage Size Checker
  • Multiple Authority Link Checker

Demo here

Read more...

7 Super Tools For Faster Windows File Copy / Move Process

7 Super Tools For Faster Windows File Copy / Move Process
Looking for a faster way to copy or move your files between folders and partitions in Windows? If you think that the default Windows file copy tool is too slow for such a simple task, try one of these 7 cool alternatives to speed up your Windows file copy / move process. In my test, FastCopy is the fastest, followed by BurstCopy and TeraCopy.

faster-windows-file-copy-tools


Freewares

1- FastCopy
FastCopy claims to be the fastest copy/delete software on Windows.
fastcopy

2- TeraCopy
TeraCopy is a compact program designed to copy and move files at the maximum possible speed, providing the user a lot of features like transfer pause and resume, error recovery, shell integration, interactive file list and more.
teracopy

3- CopyHandler
A small tool designed for copy/move files and folders between different storage medias. Claims to perform 6-7 times faster than the standard Windows operation.
copyhandler

4- SuperCopier
SuperCopier makes the Windows file copy dialog box a little bit snazzier. It adds more functions like pausing, skipping a file, copy lists, and file transfer speed throttling.
supercopier

5- Total Copy
Copies file slightly faster than Windows (approximately 10% locally). Installs itself as an additional option to the Windows file copy function.


Payware with Free 30 Day Trial

6- BurstCopy
This utility that can speed up transfers on your hard-drive by up to 200%; so it claims. Simple yet intuitive interface.
burstcopy

7- CopyFaster
This software bypasses Windows 2000′s file cache to speed up its file transfer process. Works with Windows 2000 only.
copyfaster
If you know more tools and tips to speed up the Windows file copy process, share your thoughts by leaving a comment or two below. Let us shall make our Windows works much faster than ever!
Enjoy!


Read more...

How to Fix “Could Not Connect to the System Event Notification Service” Error in Windows Vista

 How to Fix “Could Not Connect to the System Event Notification ServiceError in Windows Vista
Sometimes Windows Vista does “special” things that sometimes made me say “This beats me!” a few times. Thankfully, there are many people out there that face the same problem as mine and already posted a solution online. One of the most recent problem that I’ve experienced is that I could not connect to the Internet after I got the error message “Windows could not connect to the System Event Notification Service service. Please consult your system administrator.
The best part is that I logged on to my machine with an administrator account! Lol! After searching the net for solutions (plus a few times cursing Microsoft), I’ve found one that works!


windows-vista-system-event-notification-error


How to Fix “Could Not Connect to the System Event Notification Service” Error
1- Log on to your Windows system. Just ignore the error message for the time being.
2- Go to Windows Start button -> All Programs -> Accessories
3- Right click on Windows Command Prompt and choose Run as administrator. Wait for the Command Prompt to launch.
windows-vista-system-event-notificator-error-message-1
4- Using the command prompt, navigate to the C:\Windows\System32\ folder.
5- Type “netsh” and press Enter. The prompt will change to netsh>
6- Type “Winsock reset“. Press Enter once more.
windows-vista-system-event-notificator-error-message-2
7- Reboot your computer.

I cannot guarantee that this will work for you but in my case, the problem disappeared after the next Windows reboot. I don’t even want to know what “Winsock reset” really did. I am just happy the System Even Notification error message had gone away and if you happen to encounter the same problem, this is worth a try!
Read more...

how to set up an ssh server on windows

The free, open source application Cygwin can be used in combination with OpenSSH to turn Windows Vista into an SSH Server. Cygwin is an extremely robust application and one of the many uses of Cygwin is an SSH Server. This tutorial will demonstrate how to setup Cygwin and consequently OpenSSH on Windows Vista. Among many other things, OpenSSH can then be used to transfer files and setup a SOCKS proxy to encrypt your browsing session.

The first step is to download OpenSSH. OpenSSH is bundled in an application called Cygwin. Download Cygwin from the project homepage. Cygwin is the setup.exe file on the project homepage.

Move the executable file into C:'Cygwin'setup.exe

Step 1: Setup SSH Server in Windows with freeSSHd

This is an absolute noob guide , so I’ll explain in detail. If you are an advanced user (boo!), you are welcome to skip the installation steps.
1- freeSSHd is the easiest software to use to get SSH working in Windows. Download freeSSHd before proceeding any further.
2- Double click the freeSSHd installer that you have downloaded to get started.
freesshd-windows-ssh-server
3- Click Next -> Click Next (or you can change the default installation directory) -> Click Next (Full Installation) -> Click Next (Start Menu Folder) -> Click Next (Create a desktop icon) -> Click Install (ready to install) -> Wait until installation has been finished -> Click Close (Try other products…)

setup-freesshd-first-screen
4- “Do you want to run freeSSHd as a system service?” I choose “No” so I can start freeSSHd manually. This is a good security practice because you don’t want to have running applications in the background if you are not using it. Only turn freeSSHd on when the need for remote connections arise!
start-ssh-as-system-service-option
5- Click Finish to complete freeSSHd installation.


Step 2: Run freeSSHd

6- Double click the freeSSHd icon on the desktop to load your SSH server. You can see the freeSSHd icon on your system tray.
7- Right click on the icon and click Settings.
go-to-freesshd-settings
8- Make sure that the freeSSHd settings page (Server Settings tab) shows that your “SSH server is running”.
check-running-freesshd-server

Step 3: Create a New SSH User

9- Click on the Users tab. You need to create at least one user account that will act as your SSH remote user account.
add-ssh-users
10- Click “Add” to create a new user. Fill in the user details, following the example shown below (with your own unique username and password, duh!). Click OK and make sure it appear on the Users tab list.
ssh-users-created

Step 4: Test SSH Access with Putty (Local)

11- Using the same computer that you install freeSSHd previously, download Putty. Putty is a desktop command line client that you can use to access SSH servers.
12- Double click the Putty installer to run it. Fill in the details as shown in the diagram below. 127.0.0.1 means that you are testing the SSH access from a local connection.
test-ssh-with-putty
13- Press “Yes” on the security alert screen. Insert your SSH username and password that you have created previously.
accept-sha-key-putty
test-ssh-with-putty-2
14- If you get a Windows command prompt, you have successfully access your SSH server! Congratulations!
test-ssh-with-putty-3
15- Connect your computer to the Internet / local network and take note of your computer’s IP address.

Step 5: Test SSH Access with Putty (Remote)

16- Using another computer e.g. your office computer, download Putty again.
17- Repeat step 12 to 13 above but this time, use your SSH server IP address (type it inside Host Name or IP Address field).
18- If you get a Windows command prompt, you have successfully access your SSH server from a remote computer! Double congrats to you!
test-ssh-with-putty-4

There you go, a complete noob guide to setup a SSH server in Windows, using the super simple freeSSHd application. Be geeky and try it today!


Read more...

Why Choose Windows Media Video Streaming Hosting

Why Choose Windows Media Video Streaming Hosting

If I were to open a website, and I wanted to host videos on my website, I would have a lot of options open to me. Many websites will offer videos, and they too have many different options.

However, some options are just better than others and there are a number of ways that a person can look at this when they think about how they want to host their streaming videos. Streaming videos are fast and offer efficiency and quick delivery to the individuals that are trying to watch the videos that are offered. But it is also important to offer a good hosting service people if people have to download new materials in order to be able to see the video, they may not want to do that and the individual that is hosting the video will probably lose out on having a loyal member of their online community, while that web surfing individual will be losing out on seeing a potentially great video. When it comes to deciding how to host the videos that are offered, a person will want to see what is most popular when it comes to hosting videos, so that more people would be likely to just be able to see the videos without having to download anything else.

It should come as little surprise to anyone that since computers come with Windows installed on the computer that the most popular choice would be to look into Windows Media video streaming hosting on the website. Windows Media video streaming hosting is the best choice because everyone already has this installed on their computer, so the individual viewer does not need to change anything, unless for some reason they uninstalled the program when they got their computer. Since far fewer people are likely to uninstall a program that is popular than install a program that isn’t as well marketed, this again proves that Windows Media video streaming hosting is a good idea. This is true no matter what type of genre is being put up on the Windows Media video streaming hosting website. Sometimes the genre is news, other times it is adult entertainment. This does not matter to the hosting program.

Not only that, but the updates are automatic. When a person goes to your website, they will rarely run into a problem if you offer Windows Media video streaming hosting. This is because when there is an update ready with the Player, Windows will tell the individual and they will be able to update it then. Sometimes the update is even automatic which will save the individual a lot of time later when they go to your website and notice your decision to go with Windows Media video streaming hosting. While the individual might not be able to tell that this is such a benefit to them, since they simply will likely not come up against a problem, they might not understand how superior you hosting is at first, but they likely will if they ever try to look anywhere else.
Read more...

Windows patch management policy adherence

 Windows patch management policy adherence

Windows patch management is more than just a technical matter, it is inclusive of an overall process that needs to be managed from a clerical and policy standpoint. While there are different approaches to accomplishing patch deployment and installation, these methods should be driven by a solid policy that dictates a requirement for the installation of the patches in a timely fashion on all computer systems that are interconnected on a network.
The need for windows patch management is simple: The presence of even a single unpatched device on a network can essentially nullify all the work involved in patching the other systems. One single computer that has allowed the execution of malicious code through the lack of a windows patch management plan can compromise the security of all the other systems on the network. A computer that has been taken control of through a security flaw is an access point for that person to utilize the network credentials of the authenticated session on the victim computer. That enables the party remote controlling the computer to view network resources to the access levels granted to the user logged on to the violated computer.
By strict adherence to a windows patch management policy, such risks can be averted by depriving the opportunity of intrusion from any computer on your corporate network. This stance on windows patch management should be written into official policy and the expectation of adherence should be communicated effectively throughout the organization. Although the IT staff are likely the source to carry this windows patch management policy out, end users are depended on to follow reboot prompts or any other action required on their part to progress the installation of security patches, as well as being expected to report any anomalous behavior either on the system or the windows patch management process itself.
Read more...

How to format a hard drive windows 7

how to format a hard drive windows 7

 If you want to format a hard drive while using or installing Windows XP, you've come to the right place. This can be very useful for clearing everything off a secondary drive or when installing a fresh copy of Windows. Formatting a computer hard drive is simple and can help eliminate viruses, storage issues and other hard-to-resolve problems.

Difficulty:
    Moderately Easy

Instructions

    Preparation
        When you format a computer hard drive you will lose everything that is on the drive. Therefore, it is very important to back up anything you might want later. Additionally, if you are going to be formatting and installing XP you need to make sure you have the discs for any applications or third party hardware you use since you will need to re-install your programs and drivers after re-installing Windows.
      Take a moment to think of anything that you have on the computer that you wouldn't want to lose. Generally, you probably want everything in your My Documents folder, and you also want to save things like your favorites or bookmarks from your Web browser. Remember that each user on the computer has his or her own My Documents folder, Desktop items and Favorites/Bookmarks.
        Save everything to a CD, DVD or a hard drive that you won't be formatting.
    Formatting a Secondary Hard Drive
        Right-Click on the "My Computer" icon either on your desktop or in the Start Menu and select "Manage."
       A new window titled "Computer Management" comes up. Select "Storage" from the left hand side by clicking it once, then select "Disk Management(local)" from the right side by double-clicking it.
         Now in the lower part of the main frame (right side) of the window you should see a nice visual of all your hard drives. Each line is a different drive. Each box on a line (with a colored bar at the top and a size displayed in MB or GB) is a partition on the drive. Partitions are separations of space on a drive. Unless you are doing something specific that requires multiple partitions, you only want one partition per drive.
      First you must delete any existing partitions on the drive you are going to format. Do this by right-clicking on the partition's box and selecting "Delete Partition..." Since you already know that you will be deleting everything on the drive, and have already backed everything up, you can safely say yes to any warning the computer presents you with.
        If there are multiple partitions make sure you have saved everything off them since they might each have different drive letters (i.e. "D:" or "F:"). Then repeat the above step for each of them. If you only want to format one partition that is OK and you can continue to the next step without deleting the other partitions.
         The box for the drive to be formatted should now have a black bar at the top of it and should say "Unallocated" under its size (see picture). Right click on it and select "New Partition..." The New Partition Wizard comes up.
       In the New Partition Wizard click next. On the next page make sure "Primary Partition" is selected and click next. Now make the size equal to the maximum (it should already be set to it), and click next again. On the next page the computer will automatically choose the first available drive letter for the new drive. However, if you like you can choose another drive letter from the drop-down menu, and then click next.
         Finally the New Partition Wizard asks if you would like to format the new partition and if so what format. Choose "NTFS" as it is faster and more secure. Leave the "Allocation unit size" as "Default." In the "Volume label" field enter whatever name you want the drive to have. Simple is better. Avoid using spaces. Lastly, if the drive is brand new and has never been used before check the "Perform a quick format" box. If the drive has been used before leave this box unchecked. Leave the "Enable file and folder compression" box unchecked and click next. Then on the next page click finish.


        The wizard will now spend a little while formatting the drive. On old or large drives this may take a while. Do not close the "Computer Management" window until it finishes. You will know it is done when the word under the size of the drive changes from "Formatting" to "Healthy" and the name and drive letter you chose for the new drive show up. After it is finished you can proceed to use your newly formatted drive.
    Formatting and Installing from the Windows XP CD
       This section explains how to reformat a drive from the Windows XP installation CD. This can be used when installing a fresh copy of Windows onto a computer. Here it is especially important to backup all of your important information because upon formatting you will lose EVERYTHING that used to be on the drive. This includes all applications and device drivers, so you must back up everything you can.
         Insert your Windows XP installation disc into your CD drive (Home or Pro--it does not matter).
         Now as you computer boots a little more it will say "Press any key to boot from CD.." press a key to do so.
         The CD will load up a blue screen and then spend a while loading files it needs. When it is finished it will list a few options, mainly "Press ENTER to set up Windows XP." Press Enter or Return.
         Now you will be at a screen to select where to install Windows to. This is where you can delete old partitions and format drives. The box in the bottom half of the screen shows all your drives and the partitions that exist on them. Use the Up and Down arrow keys to highlight your "C:" partition and press the 'D' key (if all that shows up is "Unpartitioned space" and you have no C: or D: partitions, skip this step). On the next screen press the 'L' key to finalize deleting the partition.
        Now you are back on the screen to choose where to install Windows. The box on the lower half of the screen should no longer show a partition but simply have an entry "Unpartitioned space xxxxxMB." Select this with the arrow keys and press the 'C' key to create a partition on the drive. The next screen tells you the minimum and maximum sizes the partition can be and lets you pick the size. The default size is the maximum, but double check that the number entered is the maximum and hit enter.
            Now you will again be back at the choose where to install Windows screen. But this time you will have a partition that looks something like this "C: Partition1 [New (Raw)]xxxxxxMB." Highlight this entry and press enter.
          The next screen lets you choose which file system to format the drive with. Choose NTFS as it is faster and more secure. If the drive is brand new and has never been used before then use one of the options that ends in "(Quick)." Or, choose one of the lower down options. Use the arrow keys to select the proper one and press Enter or Return.
       From here you are all set and the installation of Windows will proceed starting with a format of your drive. This will take a while (over half an hour) so you can take a little break.


Read more...

How do I share a printer on a network?

To share a printer over a network in Windows XP, follow these steps:

1. Click Start.
2. Click Control Panel.
3. Click Printers and Faxes.
4. Right-click on the printer you would like to share.
5. Click Sharing.
6. Open the Sharing tab and click Share this Printer.
7. Type a Share Name for the Printer.
8. If you will be sharing the printer with others using different hardware or operating systems, click Additional Drivers.
      • Select the environment and operating system for the additional computers.
      • Click OK to install the additional drivers.
9. Click OK.  If you have installed additional drivers, click Close.

To stop sharing a printer, follow these steps:

1. Click Start.
2. Click Control Panel.
3. Click Printers and Faxes.
4. Right-click the printer you no longer want to share.
5. Click Sharing.
6. Open the Sharing tab.
7. Click Do Not Share this Printer.
Read more...

how to share a printer on a wireless network

how to share a printer on a wireless network
You may be wondering about how to share a printer on a wireless network. Well, it is really quite simple. Once you add a computer to a workgroup, you can then share them with a wireless printer. The shared printers can be of two types- network printers and local printers. While the network printers are directly connected to a network the local printers are attached to a particular computer on a network. 


Understand how to share a printer on a wireless network
In order to share a printer:
- The Printers control panel is to be opened by clicking Start, pointing to Settings (or Control panel) and then clicking Printers (or Printers and Faxes option).
- The printer that is desired to be shared is to be selected and the Sharing tab is to be clicked. To share or not to share the printer can be chosen in the Sharing dialog box.

New printers installed on any of the networked machines can also be shared. The Add Printer Wizard will detect your computer network and allow you to share printers.

If the Sharing option cannot be accessed or a message is shown indicating that file and printer sharing is not turned on then the File and Printer Sharing component in Windows needs to be enabled.

Important points about how to share a printer on a wireless network:

While sharing printers and scanners the following things ought to be kept in mind-
- Upon choosing to share a printer a name is to be assigned to it in the Sharing dialog box that will help identify it.
- In order to use a shared printer each of the computers in the workgroup need have the printer driver installed- such that it works correctly with its operating system.

Read more...

windows restore registry - How to Backup and Restore the Registry in Windows 7 and Vista

How to Backup and Restore the Registry in Windows 7 and Vista

Restore a REG File to the Registry in Windows
NOTE: Any new keys and values added to the registry not included in the .reg file at the date it was created will not be affected.
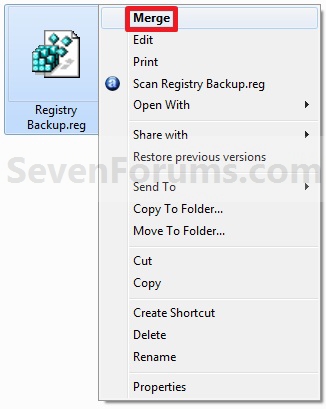
1. Merge from the REG File
A) Right click on the backup .reg file and click on Merge. (See screenshot below)
Registry - Backup and Restore-import-2.jpg
B) Click on Yes and Yes to approve the merge.

C) Go to step 3.
OR

2. Import from Regedit
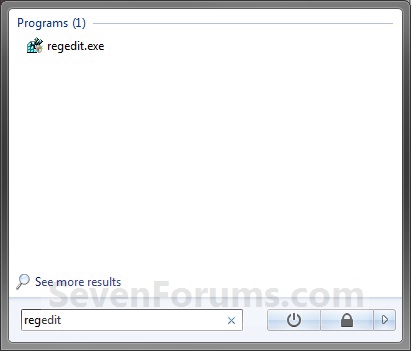
A) Open the Start menu and type regedit in the search line, then press Enter. (See screenshot below)
Click image for larger version

Name: Search_Box.jpg
Views: 631
Size: 33.4 KB
ID: 4858
B) If prompted by UAC, click on Yes to approve.

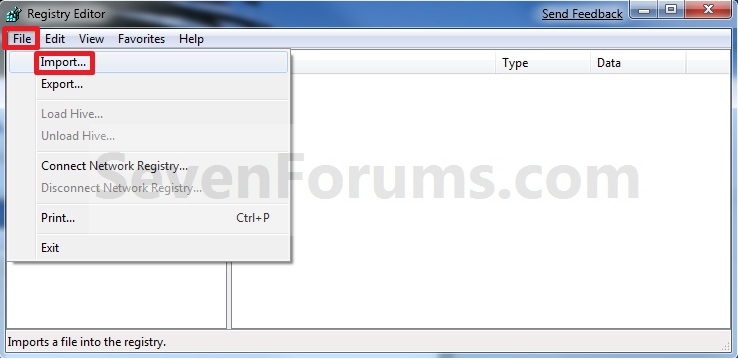
C) Click on File on the menu bar, then click on Import. (See screenshot below)
Registry - Backup and Restore-import.jpg
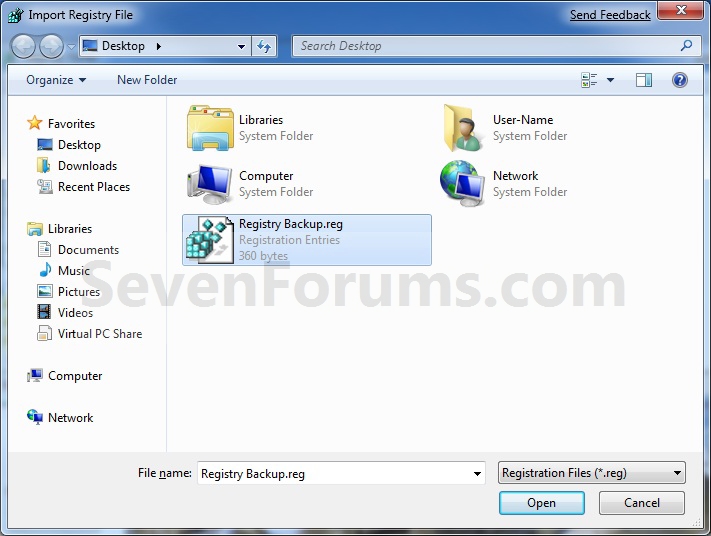
D) Navigate to where you saved the backup .reg file and select it, then click on the Save button. (See screenshot below)
Registry - Backup and Restore-import_location.jpg
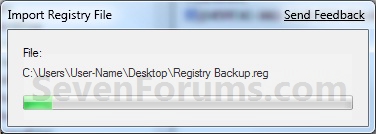
E) You will now see the import progress window. (See screenshot below)
Registry - Backup and Restore-import_progress.jpg
3. Click on OK.
Tip   Tip
If you get the error below, then you will need to do a system restore instead since the keys are in use.

Registry - Backup and Restore-error.jpg


Read more...

enable system restore - How to Enable or Disable System Restore in Windows 7

How to Enable System Restore in Windows 7
How to Disable System Restore in Windows 7 

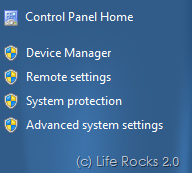
System Restore helps you to restore the computer to a previously saved state in case any thing goes wrong with your OS. You can configure System Restore for one drive or all drives in your PC, so that when you create a System Restore point, only those drives are restored where this functionality is enabled. To configure System restore, right click on ‘My Computer’ and select Properties. In the left hand side of the properties window, click on the link ‘System protection’.
System restore
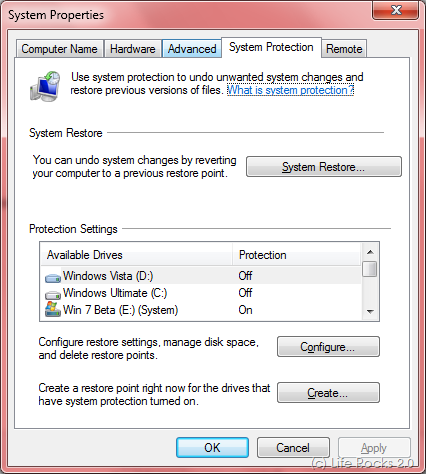
This will open up the System protection tab where you can configure System Restore.
System Restore Tab
Here you can see which all drives are having System Restore enabled. You can change the setting by selecting the drive and clicking on Configure button.
Configure System Restore
Here you can turn off or on System Restore for the selected drive and also configure the disk space for System restore by dragging the slider. Since enabling System Restore consumes hard disk space, you can it turn off on drives which does not need them.
Read more...

system restore disabled by group policy - How To Resolve System Restore Disabled By Group Policy Error In Windows

system restore disabled by group policy

The System Restore feature in Windows is useful for restoring your PC back to older settings in case some application or settings start hampering its functioning.
If you get the error, “ System Restore has been turned off by group policy. To turn on System Restore, contact your domain administrator “ while trying to access system restore then it could be possible that your firm’s IT department(if it’s your office workstation) has blocked it, or it got turned off automatically due to some reason.
system-restore7
This article tells you two ways to enable system restore if you get the above error message when you try to access it.

Method 1: Enable System Restore Configuration Interface through Group Policy Editor.

You can enable system restore configuration by disabling Turn off Configuration and System restore policy.
Step 1. Click Start start button, click Run and type gpedit.msc.
run-gpedit.msc
Step 2. Expand Computer Configuration and then expand Administrative Templates.
group-policy-editor
Step 3. Expand System, and then click System Restore.
system-restore
Step 4. Double click on Turn off System Restore.
system-restore1
Step 5. On the Setting tab, select Disabled.
system-restore4
Step 6. Double-click Turn off Configuration, and then on the Setting tab, select Disabled.
system-restore5
Step 7. Exit the editor and reboot your PC.

Method 2: Enable System Restore Configuration Interface through the Registry Editor

Following are the steps to enable it via the registry.
Note: Make sure that you backup your registry using File->Export before you attempt to make any changes.
Step 1. Press Start start button. Click Run. Type regedit and click OK.
regedit2
Step 2. On the registry editor double click on HKEY_LOCAL_MACHINE folder to expand it.
regedit3
Step 3. Expand SOFTWARE folder.
regedit4
Step 4. Expand Policies> Microsoft> Windows NT> SystemRestore.
regedit5
Step 5. On a right panel right click on DisableConfog and DisableSR and select delete option from right hand menu.
regedit1
Step 6. Exit the editor and reboot your PC.
These two method are work well on home editions and professional versions of Windows XP and higher.
After restarting your PC, Go to start button and type System Restore in a search box (In Windows Vista).
system-restore6
System Restore window will appear now.
system-restore8
That was how you resolve System Restore disabled by group policy error in Windows.
Read more...

Your IP

IP
Blogger Widgets

Copy code, paste your site:

<p><span style="text-align:center; display: block;"><a href="http://win7-vista.blogspot.com/2011/02/get-ip-address-widget-for-your-blogger.html"><img src="http://www.wieistmeineip.de/ip-address/?size=468x60" border="0" width="468" height="60" alt="IP" /></a><br /><small><a href="http://win7-vista.blogspot.com/2011/02/get-ip-address-widget-for-your-blogger.html">Blogger Widgets</a></small></span></p>